 日本語
日本語  Deutsch
  English
  Español
  Français
  Português
The Foundation of Competence: Building Your Own Heavy-Duty Workbench
We talk frequently in these pages about performance, anatomy, and the biological realities of being a man. But confidence isn't just biological; it’s behavioral. It’s forged in the actions we take and the imprint we leave on our physical environment.
There is a distinct, grounded satisfaction that comes from standing back and looking at something solid, useful, and enduring that exists solely because your hands and your will brought it into being.
In a modern world that increasingly pushes men toward passive consumption, the act of creation is a necessary corrective. It re-establishes your agency. But before you can craft fine furniture, tune an engine, or repair the items in your home that protect your family, you need a dedicated space. You need ground zero.
You cannot do serious work on a rickety card table. A man’s workshop starts with his workbench. It is the altar of his craft. It needs to be heavier than the work you put upon it, stable enough to absorb the strike of a hammer without shuddering, and durable enough to take a beating for the next thirty years.
This isn't just a project; it’s an investment in your future capability. Below is the blueprint for a no-nonsense, heavy-duty workbench designed to be the cornerstone of your domain.
Workbench Quick-Start
- Impact Driver (High torque)
- Circular Saw & Straight Edge
- Speed Square
- Wood Glue (Don't skip this)
- Budget: $150–$200
- Time: 4–6 Hours
- Weight: ~210 lbs
- Vibe: Bulletproof
Project Blueprint: The "Ironclad" Workshop Bench
The Philosophy of Design
This bench is designed for absolute rigidity and utility. We aren't building a piece of delicate cabinetry here; we are building a tank. The design utilizes standard construction lumber (2x4s) layered together to create massive strength, topped with a double layer of heavy plywood.
Why build this one? Store-bought benches are often made of thin stamped steel or particle board that sags under humidity and weight. This design, based on classic framing principles, will handle engine blocks, heavy glue-ups, and aggressive hammering without flinching. It also includes a lower shelf for essential storage, adding weight and stability to the base.
The "Ironclad" Cut List
| Part Name | Qty | Dimension | Material |
|---|---|---|---|
| Leg Segments | 8 | 35" | 2x4 Pine |
| Top Rails (Long) | 2 | 96" | 2x4 Pine |
| Top Joists (Short) | 7 | 21" | 2x4 Pine |
| Shelf Rails (Long) | 2 | 93" | 2x4 Pine |
| Main Bench Top | 2 | 4' x 8' | 3/4" Plywood |
The Materials List (Approximate Cost: $150 - $200 depending on lumber prices)
Note: Lumber dimensions are nominal. A 2x4 is actually 1.5" x 3.5".
Lumber:
-
(15) 2x4x8 Studs: Get construction grade pine or fir. Try to pick the straightest ones you can find, with minimal knots.
-
(2) Sheets of 4’x8’ x 3/4" (23/32") Sanded Plywood: One sheet is for the main top surface, the other is split for the sub-top layer and the bottom shelf. Do not use OSB (oriented strand board); it won't hold up.
Hardware & Supplies:
-
1 lb Box of 3” Deck Screws or Structural Wood Screws: (Torx drive recommended for better grip).
-
1 lb Box of 2.5” Deck Screws.
-
1 Bottle of High-Quality Wood Glue (Titebond II or III).
Required Tools:
-
Circular Saw or Miter Saw (Chop Saw)
-
Drill and Impact Driver
-
Tape Measure
-
Speed Square or Carpenter’s Square
-
Pencil
-
Clamps (at least two, 24” or larger)
Step-by-Step Build Instructions
Phase 1: The Cut List
Measure twice, cut once. Organize your lumber before you start assembling.
From the 2x4s:
-
Top Frame Long Rails: (2) pieces at 96” (Wait to cut these until you measure your actual plywood length, sometimes they are slightly over 8ft).
-
Top Frame Short Rails/Supports: (7) pieces at 21”
-
Legs: (8) pieces at 35” (This will create a standard bench height of roughly 36.5”. Adjust as needed for your height).
-
Bottom Shelf Long Rails: (2) pieces at 93”
-
Bottom Shelf Short Rails: (5) pieces at 21”
From the Plywood:
-
Sheet 1: Leave full 4’x8’ (Top Surface).
-
Sheet 2: Cut one piece at 4’x8’ (Sub-top). Note: You will likely need to trim this slightly depending on how square your frame is. Cut the remaining section to fit the bottom shelf later.
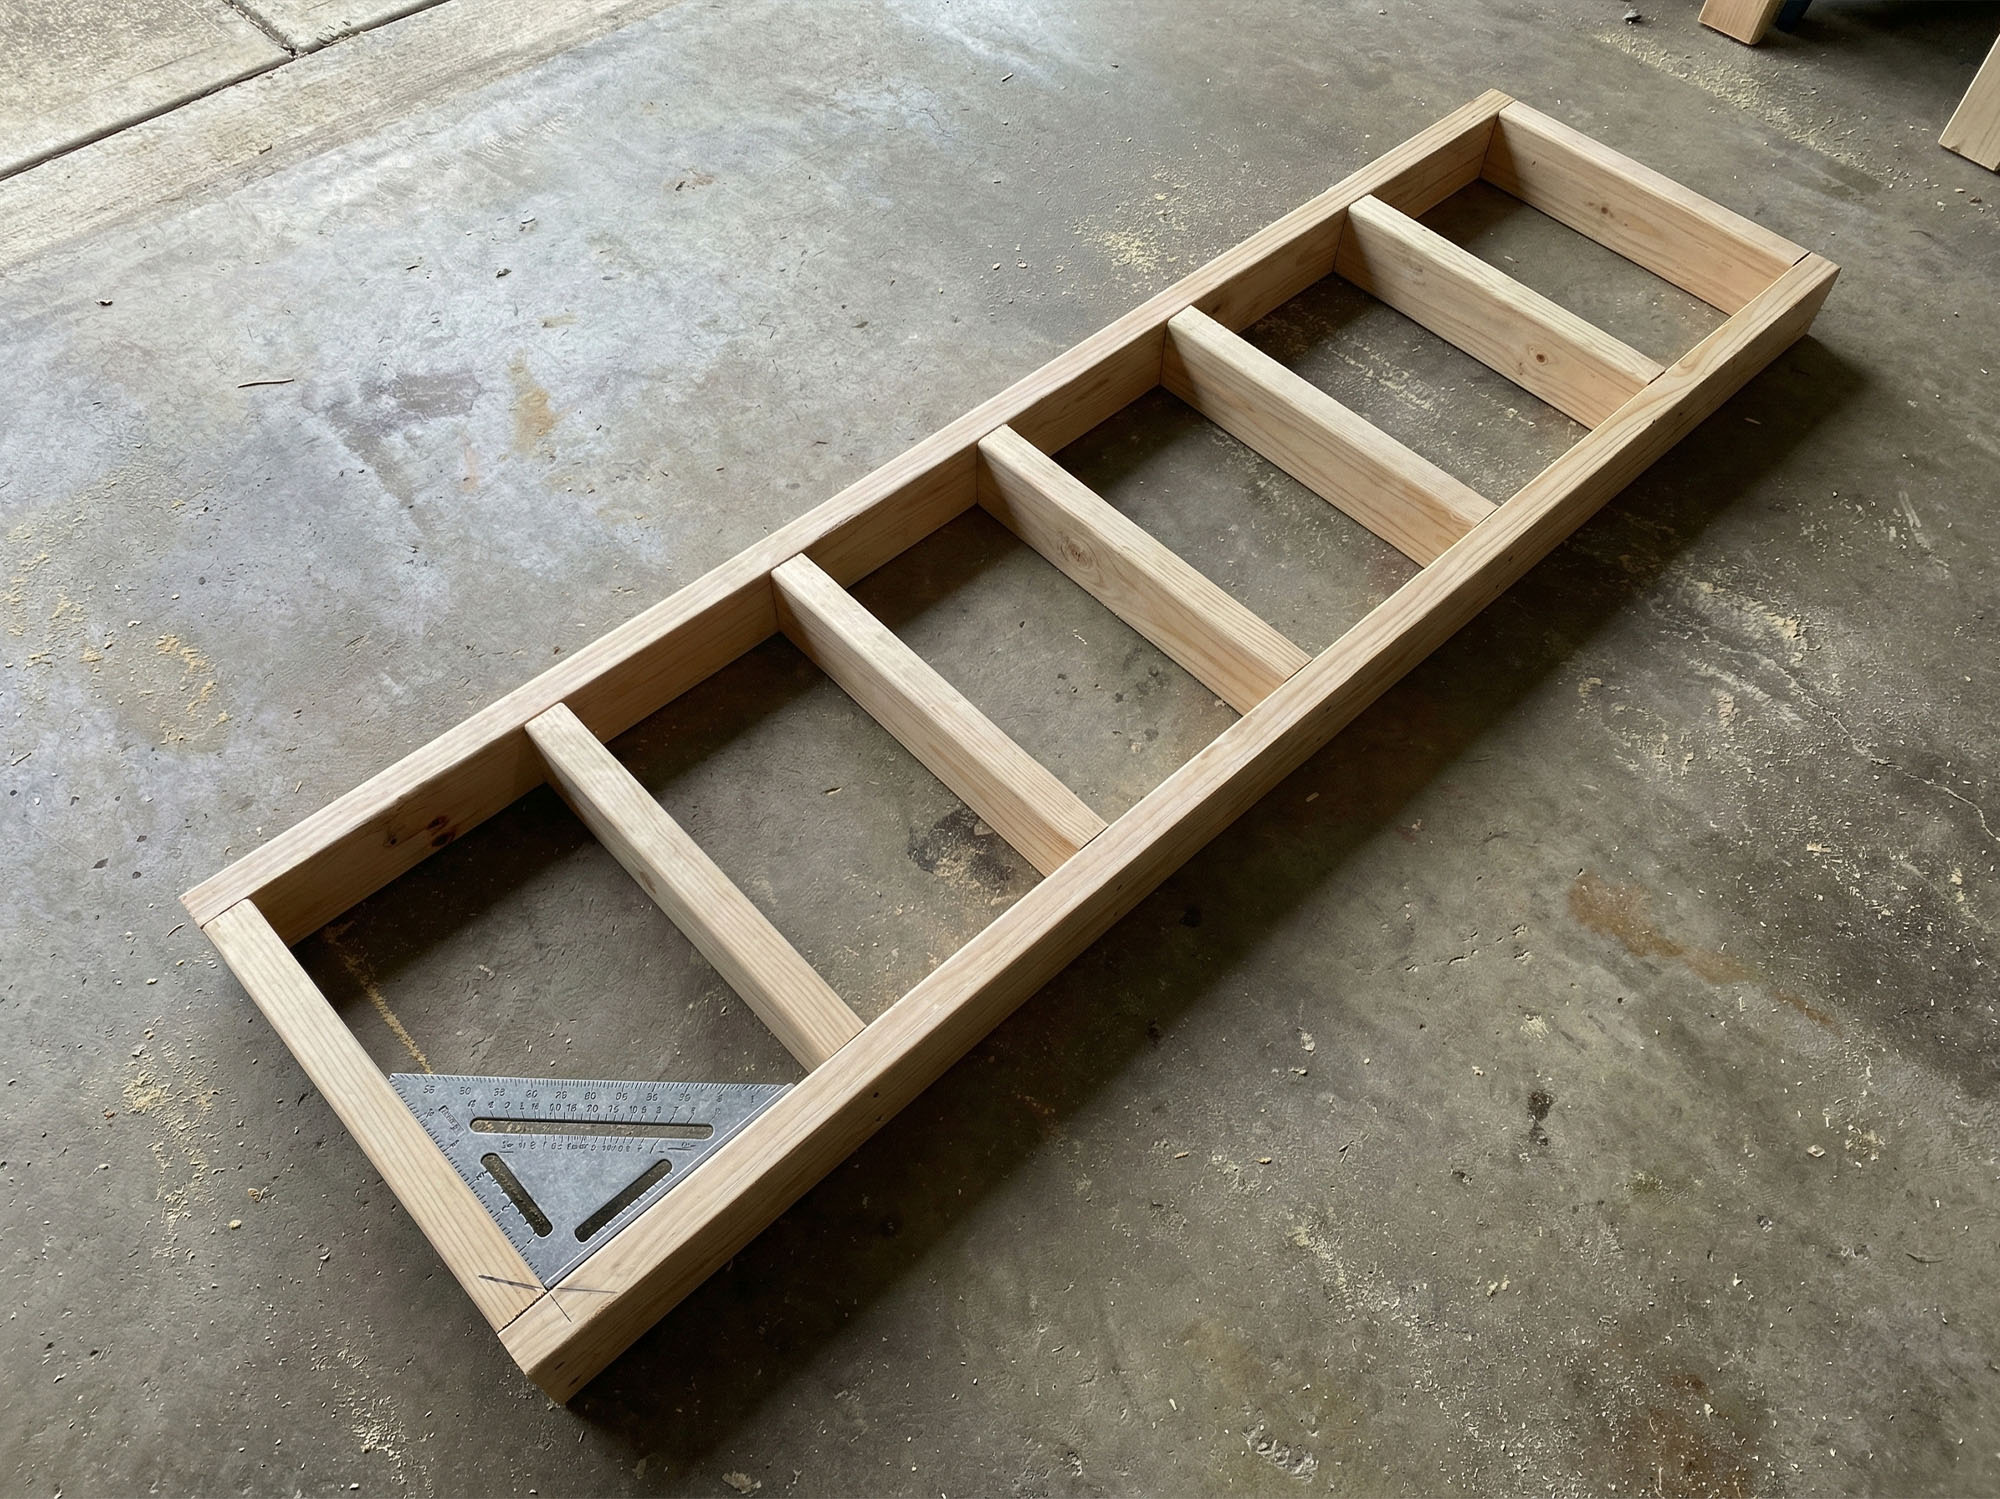
Phase 2: Building the Top Frame
We are building a "ladder frame" for the top. It needs to be perfectly square.
-
Lay out the two 96” Long Rails on a flat floor.
-
Place two of the 21” Short Rails at the very ends to form a giant rectangle measuring 8ft by 2ft.
-
Place the remaining five 21” Short Rails evenly spaced inside the frame (roughly every 16 inches on center). These are your joists.
-
Apply glue to the ends of the short rails. Pilot hole and drive two 3” screws through the long rails into each end of the short rails.
-
Crucial: Use your square at every corner to ensure the frame is perfectly 90 degrees.
Phase 3: Constructing the Heavy Legs
We won't rely on single 2x4s for legs. We will laminate them for strength.
-
Take two of your 35” 2x4 pieces.
-
Apply a liberal amount of wood glue to the face of one.
-
Stack the second one on top, aligning the edges perfectly.
-
Clamp them together tightly.
-
Drive 2.5” screws in a zig-zag pattern down the length of the leg to permanently bond them.
-
Repeat this process three more times until you have four heavy, laminated legs.
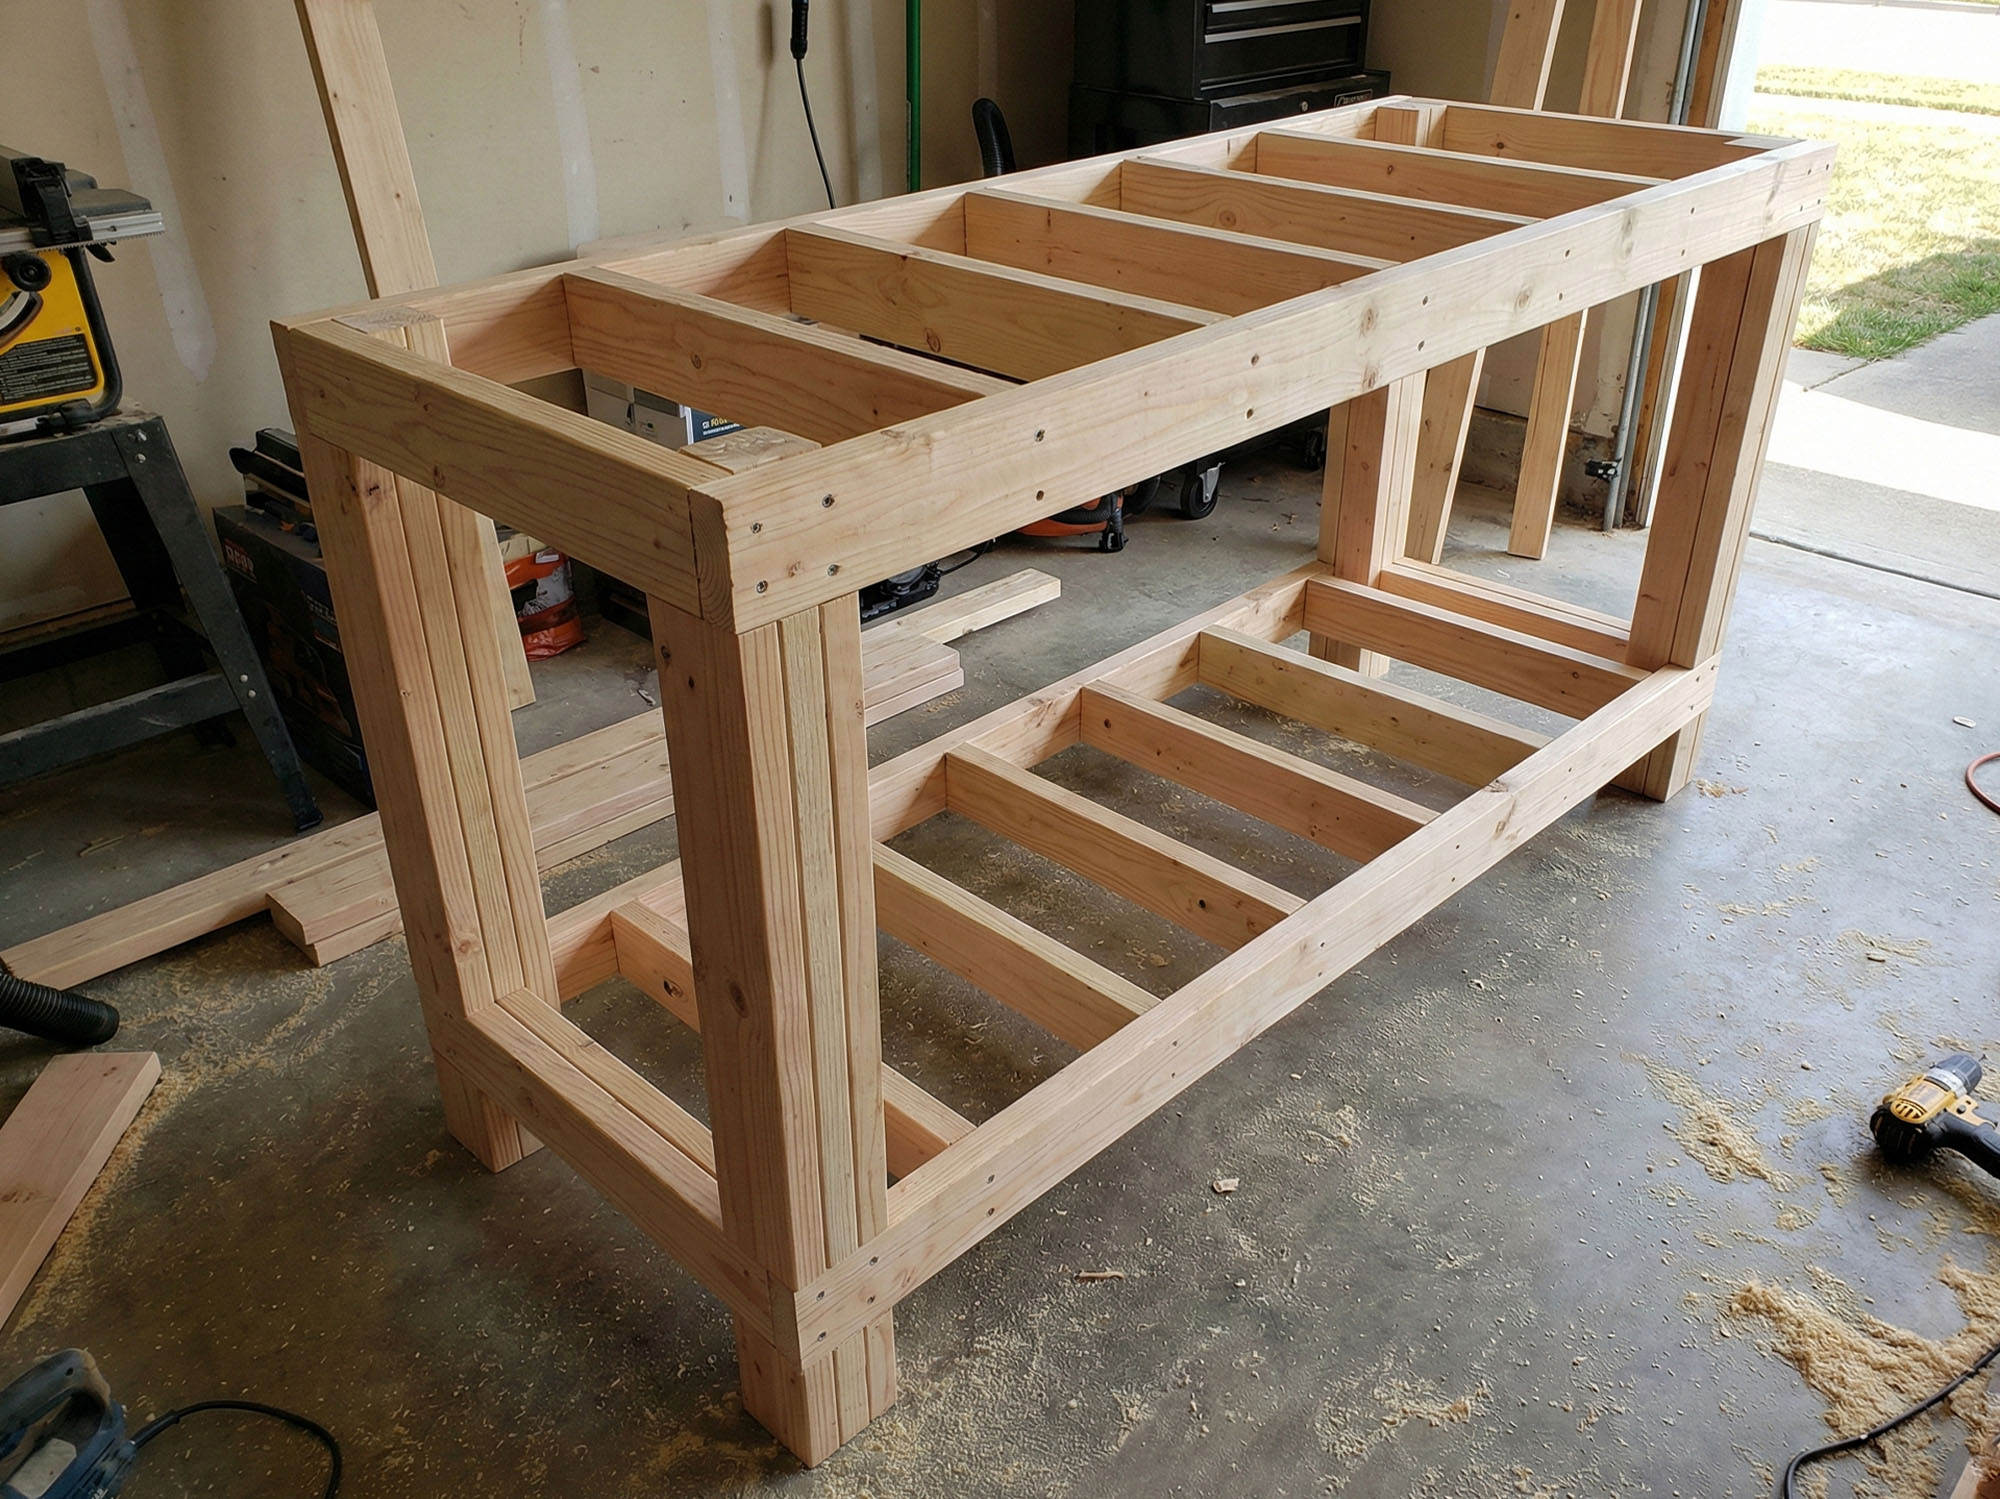
Phase 4: Assembly and Lower Shelf
This is where it starts to look like a workbench. You may need a second set of hands here.
-
Flip the Top Frame (from Phase 2) upside down.
-
Place one laminated leg in each corner. The leg should be flush with the outside corners of the frame.
-
Glue and screw the legs to the frame from the inside, using at least four 3” screws per leg, driven through the frame and into the leg structure.
-
Once all four legs are attached, flip the table upright onto its feet. It should already feel sturdy.
-
The Lower Shelf: Mark up 6 inches from the floor on all four legs. Clamp your Bottom Shelf Long Rails (93”) to the inside of the legs at these marks. Level them and screw them into the legs.
-
Install the Bottom Shelf Short Rails (21”) between the long rails, similar to the top frame, spaced evenly.
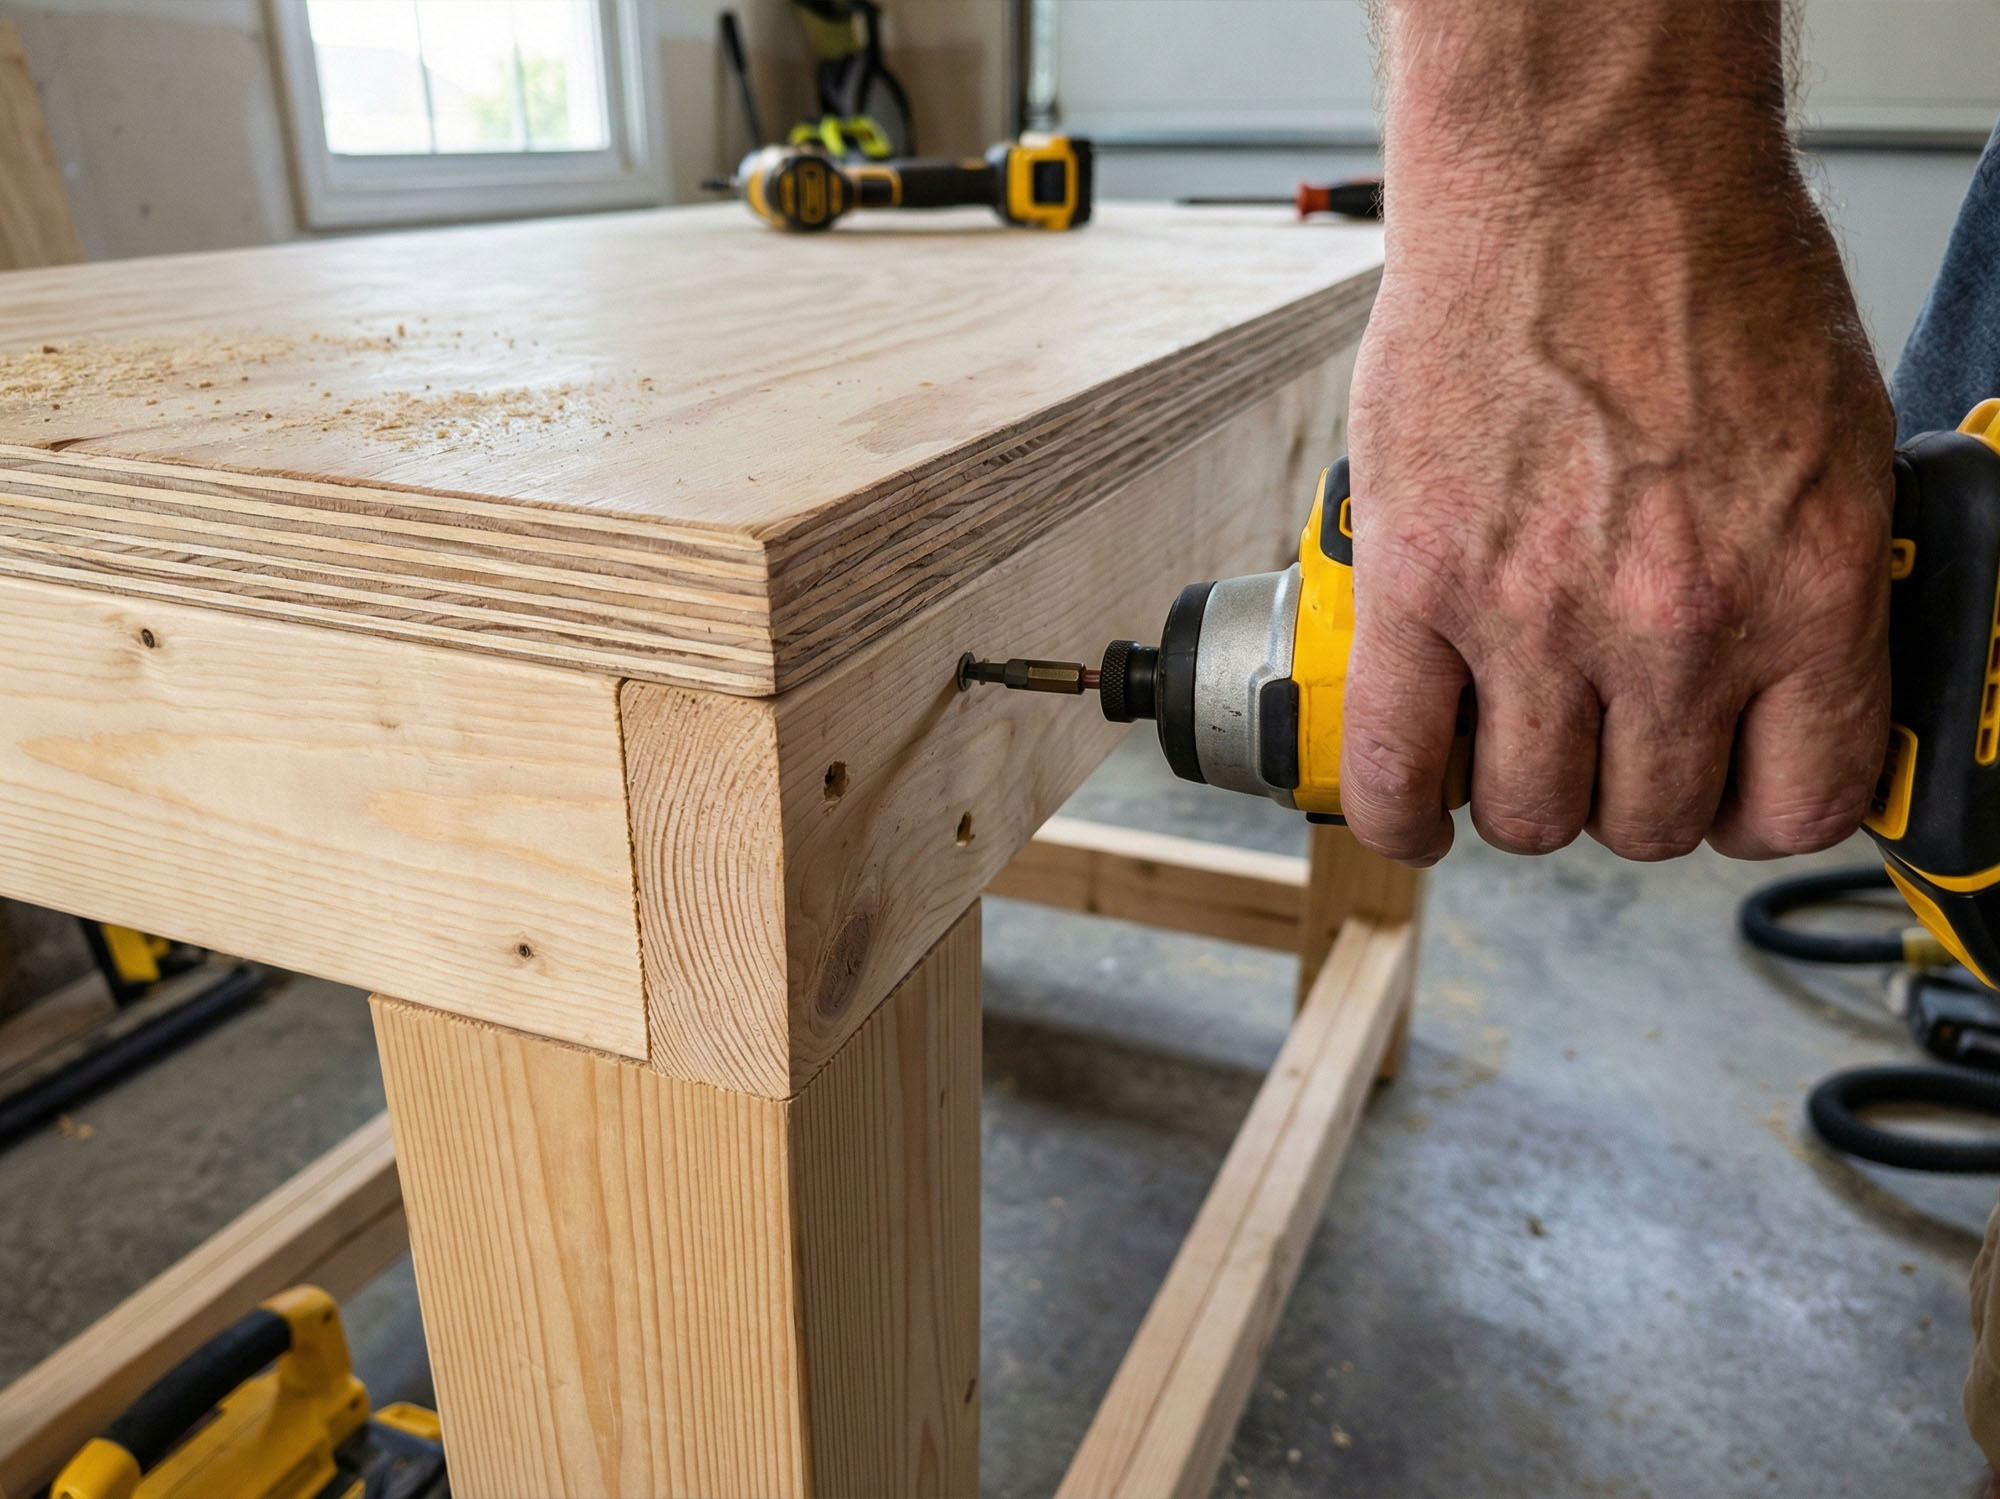
Phase 5: The Top and Finish
The final steps to making it bulletproof.
-
The Sub-Top: Lay your first sheet of 3/4” plywood onto the top frame. It should sit flush with the edges of the 2x4 frame. Glue it down to the frame joists and secure it with 2.5” screws every 8 inches around the perimeter and along the internal joists.
-
The finish Top: Apply glue over the surface of the sub-top. Lay the second, nicer sheet of 3/4” plywood directly on top. Screw this down from the top surface, ensuring your screws hit the frame below. This double layer provides massive impact resistance.
-
Optional: Trim the bottom shelf plywood to fit inside the lower leg frame and screw it down.
The Finished Altar: Ready for the Next Mission
Once the final screw is countersunk and the glue has cured, take a moment to clear the sawdust away. What stands before you is no longer just a collection of lumber and fasteners; it is a professional-grade tool.
At roughly 36 inches high and eight feet long, this bench provides the physical leverage you need for high-effort tasks. The double-layered top offers a "dead" surface—meaning when you strike a chisel or a punch, the energy goes into the workpiece rather than being lost to the bounce of a flimsy table.
The Final Touch: The Vise No workbench is truly complete without a vise. Mounting a 6-inch or 8-inch woodworking vise to the front-left corner (for right-handed men) transforms the bench into an extra set of hands. It allows you to hold boards vertically for sawing or horizontally for planing with absolute security.
Why This Matters Standing at a bench you built yourself changes the way you approach problems in your home. When something breaks, you don't immediately reach for your phone to call a contractor; you bring the broken item to this bench. You have created a dedicated space where you are the authority.
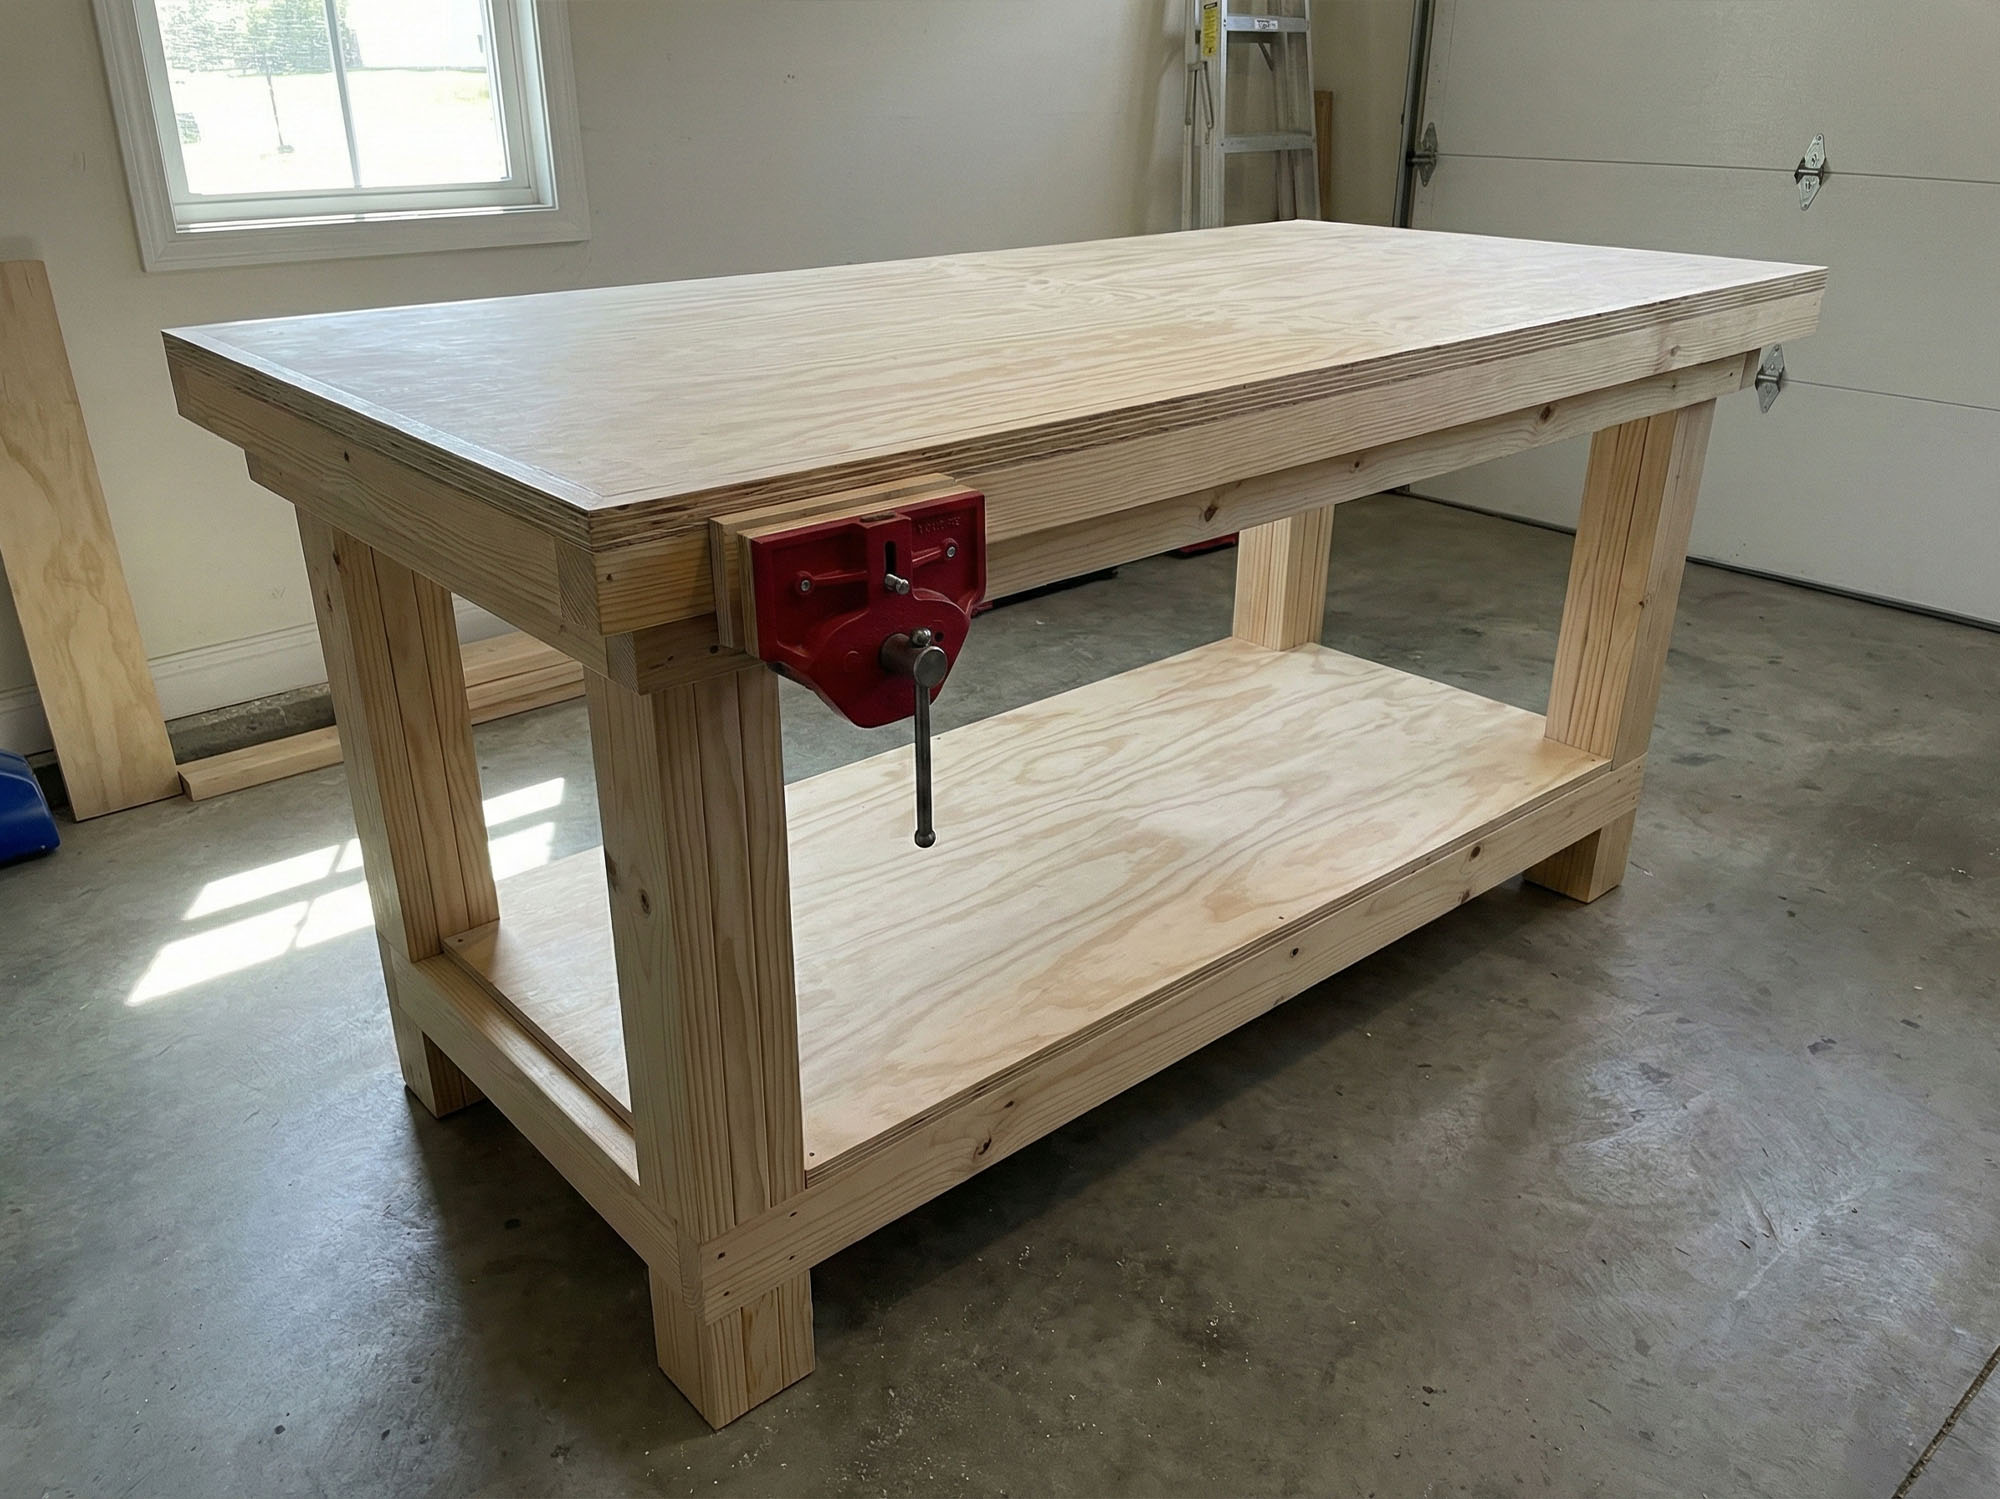
Pro-Tip: Mounting Your Vise
A workbench is only as capable as its grip. When mounting your vise, follow these three rules to ensure it remains a permanent fixture of your shop:
- 1. Bolt, Don't Screw: Never use wood screws to mount a vise. Use 1/2-inch lag bolts or, preferably, carriage bolts that go entirely through the 1.5-inch plywood top with large washers on the underside.
- 2. Flush Alignment: Mount the rear jaw of the vise so it sits perfectly flush (or slightly recessed) with the front edge of your workbench. This allows you to clamp long boards against the bench itself for maximum stability.
- 3. Add Wood Liners: To avoid marring your future projects, cut two pieces of hardwood scrap (like oak or maple) and screw them into the metal jaws of the vise. These "soft jaws" provide a superior grip without denting your work.
Workshop FAQ
The Result
You now have a workbench weighing upward of 200 pounds. It won't budge. You can mount a heavy vise to the corner, hammer on it, and spill oil on it. It’s yours. You built it. Now, get to work using it.
In Brief: The Workbench Specs
Footprint: 96" Long x 24" Wide
Height: 36.5" (Standard Shop Height)
Top Thickness: 1.5" (Double 3/4" Plywood)
Base Material: 2x4 Construction Pine/Fir
Fasteners: 3" and 2.5" Wood Screws
Adhesive: PVA Wood Glue (Titebond II/III)
Total Build Time: One Saturday (4-6 Hours)
Required Skill: Beginner-Intermediate
*Tip: Always select the straightest "studs" at the lumber yard to minimize shim-work later.
Disclaimer: The articles and information provided by Genital Size are for informational and educational purposes only. This content is not intended to be a substitute for professional medical advice, diagnosis, or treatment. Always seek the advice of your physician or another qualified health provider with any questions you may have regarding a medical condition.


